Thursday, November 6, 2014

Happy Collaborating

I've been thinking today about when collaborating really, really works for me as a tech coach. Over the past two weeks, I had a wonderful experience of collaborating with Mr. Rich, a Latin teacher. He had this incredibly helpful analysis sheet that he has been using with students for 25 years, but he wanted to modernize it to meet 21st-Century collaborative learning goals.

I did not understand the Latin part of it.

But when Mr. Rich explained the Analysis Sheet to me, it sounded like, if I could find a way to make drop-down menus in a Google Sheet, there was an online method would meet his intentions perfectly. So I Googled that, and I made the least useful drop-down menu in the history of the world:
Here's how you do it: choose data, select validation, select list of items, type in your list and separate with commas, select save. That's it. I thought, OH! I'm done. Except, I did not understand the Latin, and it turns out that those selections don't actually mean anything.

That was okay, though, because then Mr. Rich and I sat and he explained Latin to me, and we plotted out what the sheet would look like, and I taught him a few things about formatting, and then he went home, watched a webcast about sheets, and built the rest of it.

This morning, Mr. Rich presented about the Analysis Sheet and how it's working with students. In attendance were a Latin student, another Latin teacher, the head of informational technology, the head of the upper school, and me.

Mr. Rich talked about piloting the sheet in his Latin class, describing the ways the students were able to work on the sheet at the same time, in real time, collaborate, take on leadership roles and (this was my favorite) participate from home. He also explained how the sheet didn't provide the translation. Rather, it helped students through analysis collaboratively, and then individual students were able to translate the Latin. Also, he referenced the book we're all reading as a teaching community, #EdJourney by Grant Lichtman.

So then my heart was bursting with thoughts about participatory learning, distributed expertise, design, authentic audiences, and other learning theories that make me happy.

Then my negative side thought, "Wait. I didn't do anything. I just figured out how to make a drop-down menu."

I told my negative side to be quiet, and I thought about some of the reasons that collaboration worked. So, here's my analysis of why it was such a great collaboration.

  1. It was a specific change. The goal was completely manageable because Mr. Rich wasn't trying to change everything. He was just trying to change one thing. How scary is it when you think you need to change everything about your classes all at once?
  2. It aligned with Mr. Rich's curricular goals. The Latin Analysis Sheet isn't tech integration for the sake of tech integration. The first goal of the sheet is to help students to be better at Latin. The facts that it's collaborative, able to be worked on from anywhere, and available in real time are great, but the Latin is still the point. (I feel like this aligns with the 'redefinition' aspect of tech integration in the SAMR model)
  3. Mr. Rich wanted to make the change. I don't think that it would have been enjoyable in any way if Mr. Rich had felt forced to change. Because we were both invested in a similar way, our work together was fun.
  4. I didn't worry about being the Latin expert and Mr. Rich didn't worry about being the tech expert. We used each other's expertise to make a product better than either of us could have achieved individually.
  5. I spent more time listening and asking questions than I did talking. This, I think is actually the biggest key to collaboration. I'm a bit of a butterfly about tech, flitting from idea to idea. I could suggest a million toys to any teacher with whom I collaborate. But if I had, Mr. Rich would have been overwhelmed and annoyed. I feel like, with this collaboration, because I listened to Mr. Rich, he was able to own the project.
So, yes, all I contributed was a drop-down menu, but I'm still really proud of myself. That Latin Analysis Sheet is amazing.


Thursday, October 30, 2014

Coding is not just for Hipsters

A student sent me this screenshot of her coding work from tech class yesterday. I adore the sarcasm of 8th graders. In referencing sarcasm, I might sound sarcastic, but I wasn't being sarcastic. Seriously.
The site we've been using in 8th grade tech is www.codecademy.com. The 8th graders have done block-coding with Alice already, and they were excited to use what they've been calling 'real' code. They were excited, that is, until they realized what one misplaced quotation mark can do to their work.

That time I actually was being sarcastic. The students were interested throughout, although concepts of organization of code came more easily to some than they did to others. Being able to track the students as they coded let me know who needed me to jump in and explain concepts and who would probably be able to create an entire Hipster Lyfe website in 48 minutes.

(please note: the cat links to a local coffee shop that sells free-trade, organic coffee)

Wednesday, October 15, 2014

How do you say, "Creando videos"?

In Señora Bejar-Massey's 8th grade Spanish class, she asks students to record themselves speaking Spanish. Over the course of the year, students collect their videos and are able to reflect on their growth as Spanish speakers. . . awesome.

This year, Señora decided to add a few levels to the technology - students will now upload their videos to a Google Apps for Ed YouTube account (where they can make the video private and share only with Señora). They, they'll hand their assignments in via Google Classroom, and Señora will use Videonot.es to comment directly on the videos.

Because there are so many steps to this process, I'm going to be going to Señora's classes tomorrow to get the students up and running. I made this instruction sheet and posted it to the Moodle, and I thought it might be useful for others, too. I'll update later about any pitfalls I encounter.

Wednesday, October 8, 2014

Padlet & Google Docs as a Way to Go Public with Writing

I didn't mean to write two posts about ways to use Padlet in a row, but with the first 6th grade writing celebration of the year, Mrs. Dougherty wanted to find a way for students to share their writing with each other, and padlet.com it was.

Mrs. Dougherty's runs her English classes in Writing Workshop style, and there's a lot of research on the impact of audience on students' writing. So, launching an online space for students to share, comment, inspire, and generally cheer each other on made a lot of sense.

Here's how we set it up so that the wall is both public and private:
From Mrs. Dougherty's end, she created a wall on padlet.com. For settings, she selected:


  • Password Protected (so the audience is limited).
  • People with the password can write comments (which means that students can post, but can't accidentally delete others' posts)
She also selected the Grid layout so that students didn't accidentally cover up other students' work.
Here's how she asked students to post on the wall:
  1. Make a copy of your document (that way, you'll have a 'clean' version that no one has commented on).
  2. Set the sharing parameters so 'anyone with the link can comment' (that way, people can comment, but no one accidentally changes your writing). 
  3. Share the link on the padlet wall, putting your name in the top of your comment box.
What it means is that all of the grade's writing can be collected in one place, but each individual keeps control over his/her writing. They look like this after inserting the link:
As with the cat photos that I mentioned in another post, this is an internetty activity that requires talking to students about community and community values during launch (i.e. what kind of comments do you want on your writing? What kind of comments are appropriate in this forum? What kind are inappropriate?).  


Thursday, October 2, 2014

Using Padlet to Frame Discussions

In 8th grade Topics in Media and Technology this rotation, I wanted to show a video called I forgot my iPhone (which, by the way, is great). I wanted to encourage students to think critically about the messages in the video. First, I projected the video and asked for verbal responses. Then, I projected a split screen, and students made notes via Padlet about what specific activities the video said were good based on actions and images they saw:
After watching the video, students read George Couros's critique of the video. They discussed the blog post in small groups, and then posted their group's position statement about cell phones based on his blog post. Using the padlet, we then had a class discussion about cell phones use.

Some of the functions of padlet that are useful: you can create a free account, students do not have to create accounts to post, the owner of the padlet page can set permissions so students don't accidentally delete each other's posts, the owner can set a password so that the padlet isn't public, and the wall updates in real time, so you can see who's posting when. Very useful for directing a class discussion and maintaining a record of students' thoughts.

A word of warning: my first class figured out how to put cat photos in a wall. They did it after an amazing discussion, but if you don't like chaos, you'll want to set ground rules for posting.

Monday, September 29, 2014

Memes for Good, not Evil

The lesson for this 8th grade Topics in Media and Technology class was modified from Dave Baroody's Medieval Memes lesson, and the KQED How to Make a Meme video.

I started class by showing students a meme, and I asked them to tell me how memes work. After they had done that, I explained to them that the walls in my room were bare, and I wanted to make my room the most welcoming room ever. But, I told them, I didn't just mean, "Welcome to tech class." I meant, "You are welcome in this room, and it is a safe space."
They didn't quite get it at first (the first class gave me a lot of memes that had a message of, "Welcome to tech class. Tech class is fun." After the first group of students, I had each class generate a list of identity markers for which people are sometimes excluded, mocked, or ostracized. The lists tended to include socio-economic status, race, ethnicity, religion, gender, sexuality, interests. After making the lists, I explained to the students that I wanted the message of welcome to say, regardless of identity marker, you are safe here. 

Then, we talked about text/subtext, the relationship of the words to the picture, the concept of setup on the top line and payoff on the bottom line, and most importantly:
Remember that memes are meant to be funny . . . Annnnnnd these memes also need to be welcoming and kind . . . Annnnnnnd that's the challenge.
We watched the KQED video as a class, and then students worked in groups of 1, 2, or 3 to make memes.

I had students save their memes as jpgs to a shared Google folder as they completed them, and I projected the folder on the board, so they could see other people's memes as they were created. In each class, the memes started off pretty not-so-great, and then got better and better as students worked on them and saw each others' creations. It was an active learning process for students to be thinking about how welcoming or not welcoming a message might be and how the person in the image was being positioned.

At the end of class, we took a few minutes to debrief as we looked at each others' memes. Almost every student commented on the fact that it was really hard to be funny and kind at the same time. We talked about how this was hard work, and about how we often don't consider how people are being positioned when we make and share things online.

Annnd phew. Because that's why were were doing the lesson.

One last note: I put this caveat (taken from David Baroody) on the moodle site and shared it verbally as well:
Why would I give you an assignment where I knew you might run into material that may be deemed inappropriate? It is NOT because I am trying to corrupt you!
As a citizen of the digital world, you need to realize that the internet is an ENORMOUS place, and that inappropriate content, information, and individuals are out there.
More important than just realizing it's there, though, you need to understand how to protect yourself and others from images, links, and other content in which you (or others) do not wish you to engage. As an educator who employs an increasingly large amount of digital technology, I would rather have an open discussion about this with you, your peers, and your parents than ignore the issue.
If you are interested in some of the theory behind digital citizenship, please look over the Nine Elements of Digital Citizenship here.


Tuesday, September 23, 2014

How Do We Really Get to Know Our Students? iMovie!

Because all of Ms. Bo's students are new to the middle school, Ms. Bo knows that helping them to feel known is key to a successful start. So, the first unit of Ms. Bo's history class investigates primary sources. The class talks about the ways their identities impact their understanding of history, and they talk about the fact that they are the best sources for information about themselves.

In the past, Ms. Bo has had each student create a collage that demonstrates investigation into the source that is their self. Then, the students write an 8-10 sentence paragraph about the collage and the interpretation of their self.

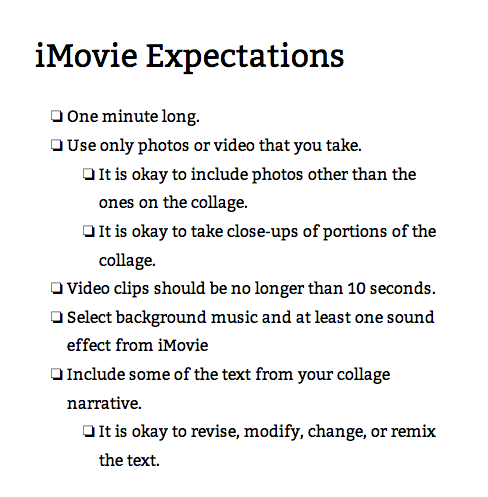
This year, Ms. Bo decided to incorporate iMovie as a digital collage, so I had the chance to collaborate with her. To keep the project manageable, we came up with this list of criteria that we shared with the students as a Google Doc:
iMovie Expectations
We asked for one minute so it was easy to share, and we had students stick to pictures they took and stock music and sound because we didn't want to compound what they needed to know about citation for the project. Since each student had a computer with iMovie already, we didn't have to worry about access, but Ms. Bo made sure to schedule plenty of in-class time to work so she could identify potential hiccups students had with using the program.

When Ms. Bo introduced the project, she first asked the students what you need to make a movie. The students shouted out ideas like a script, actors, scenery, music. Ms. Bo pointed out that they had a script: the paragraph they had already completed, and they had an actor: themselves, and they had scenery: the music. Then, I did a mini-lesson on how to use iMovie, and we let them work. We posted the instructions to Moodle as well:
The students had a lot of questions about whose picture they could use - they REALLY wanted to use photos from the internet. They also REALLY wanted to use copyrighted music. We stuck with no.

When the students went home to work on the projects, they sent Ms. Bo a lot of alarmed emails about the project, which surprised us because in class, they had seemed so on top of it. The next day, in class, it turned out that the students completely had the hang of using iMovie. We weren't entirely sure why they panicked . . . maybe because it was new to them and they were still adjusting to the middle school?

To complete the project, Ms. Bo had each student show their movie, one after another. She used the expectations as her assessment rubric, and graded them as the students showed the movies. Sitting in the classroom, listening to the students say, "Awwww!" and, "I love horses, too!" was amazing. All the students' personalities piled up on top of each other, and you could feel the group coming together as a class that cared about their classmates because each one was known. 

I thought about including some samples of the videos, but then I thought about how personal each one was. Even though the students gave me permission to share their work, I didn't want to publish videos with that much personal information. That said, here's a photo of students watching the videos during class: